Nutanix Community Edition is Alive!

Community Edition (CE) has probably been the worst kept secret of the year, though this is not really all that surprising given it was clearly a logical progression for the Nutanix NEXT community.

Ever since I first deployed my Nutanix production environment at the beginning of 2014 I knew there was a need for some sort of training environment, and I am pretty sure Nutanix felt that way too. It was just a matter of how that would take shape rather then when.

Thankfully we now have that answer. I was fortunate enough to be among the Nutanix Technology Champions invited to take part in the CE Alpha program that has now become a Beta program over the last couple of months.

Simply put Community Edition is a fork of the main Nutanix NOS tree provided free of charge and without official support to enable IT Practitioners to test-drive the Nutanix experience.

There are some strings attached to using CE that have been put in place but nothing over the top, firstly you must have a valid NEXT Community account, the Pulse service must be enabled to provide feedback to Nutanix and you must apply updates within 30 days, failure to do so will lock you out of Prism.

While official support won’t be forth coming, never fear as this is where the NEXT Community will step in and there are more then a few very switched on folks around willing to help with plenty of guidance and advise.

The CE program has been highly active, providing valuable feedback and logical discussion to the team at Nutanix responsible for CE to ensure bugs and rfe’s are addressed.

One of the most contentious points has been the debate around physical vs nested environments. At present CE is a physical bare metal solution that cannot be run in a nested lab setup.

While some people will not like the fact they have to retask their home labs so CE can consume the hardware, I for one don’t mind at all. The goal here or at least one of them was to give people in the community a chance to experiment and experience the Nutanix hyper converged platform in as close to a native fashion as possible.

At this point I think a nested CE environment would fall short of that mark. Yes it would let you experiment, but it is not the experience and it is not hyper converged. While we aren’t at Uncompromisingly Simple yet with CE, it is a pretty straightforward installation process that delivers the goods.

The process involves transferring the CE image to a USB3 pen drive, which acts as the boot device and cannot be removed after installation as it forms part of the node setup. Honestly this is the most time consuming and manual part of the entire installation process. Once this is done you can boot the installer, which will ask you for some simple network information to set the IP’s for the Hosts and CVM’s and you are done.

The entire process takes about 10 minutes per node, depending on your hardware and within an hour you will have a fully operational CE cluster.

As with all things Nutanix does there is ample documentation available that fully explains the process, which will be made available from the NEXT Community forums.

At present new releases mean reimaging the USB3 keys and starting over, however by the time Next Conference rolls around CE will have the same non disruptive one-click upgrade process we are all now used to with our production environments and I expect some of the hardware requirements may continue to change. For example in the last 24 hours the requirement for VT-d support has been dropped allowing for greater CPU / Motherboard combinations.

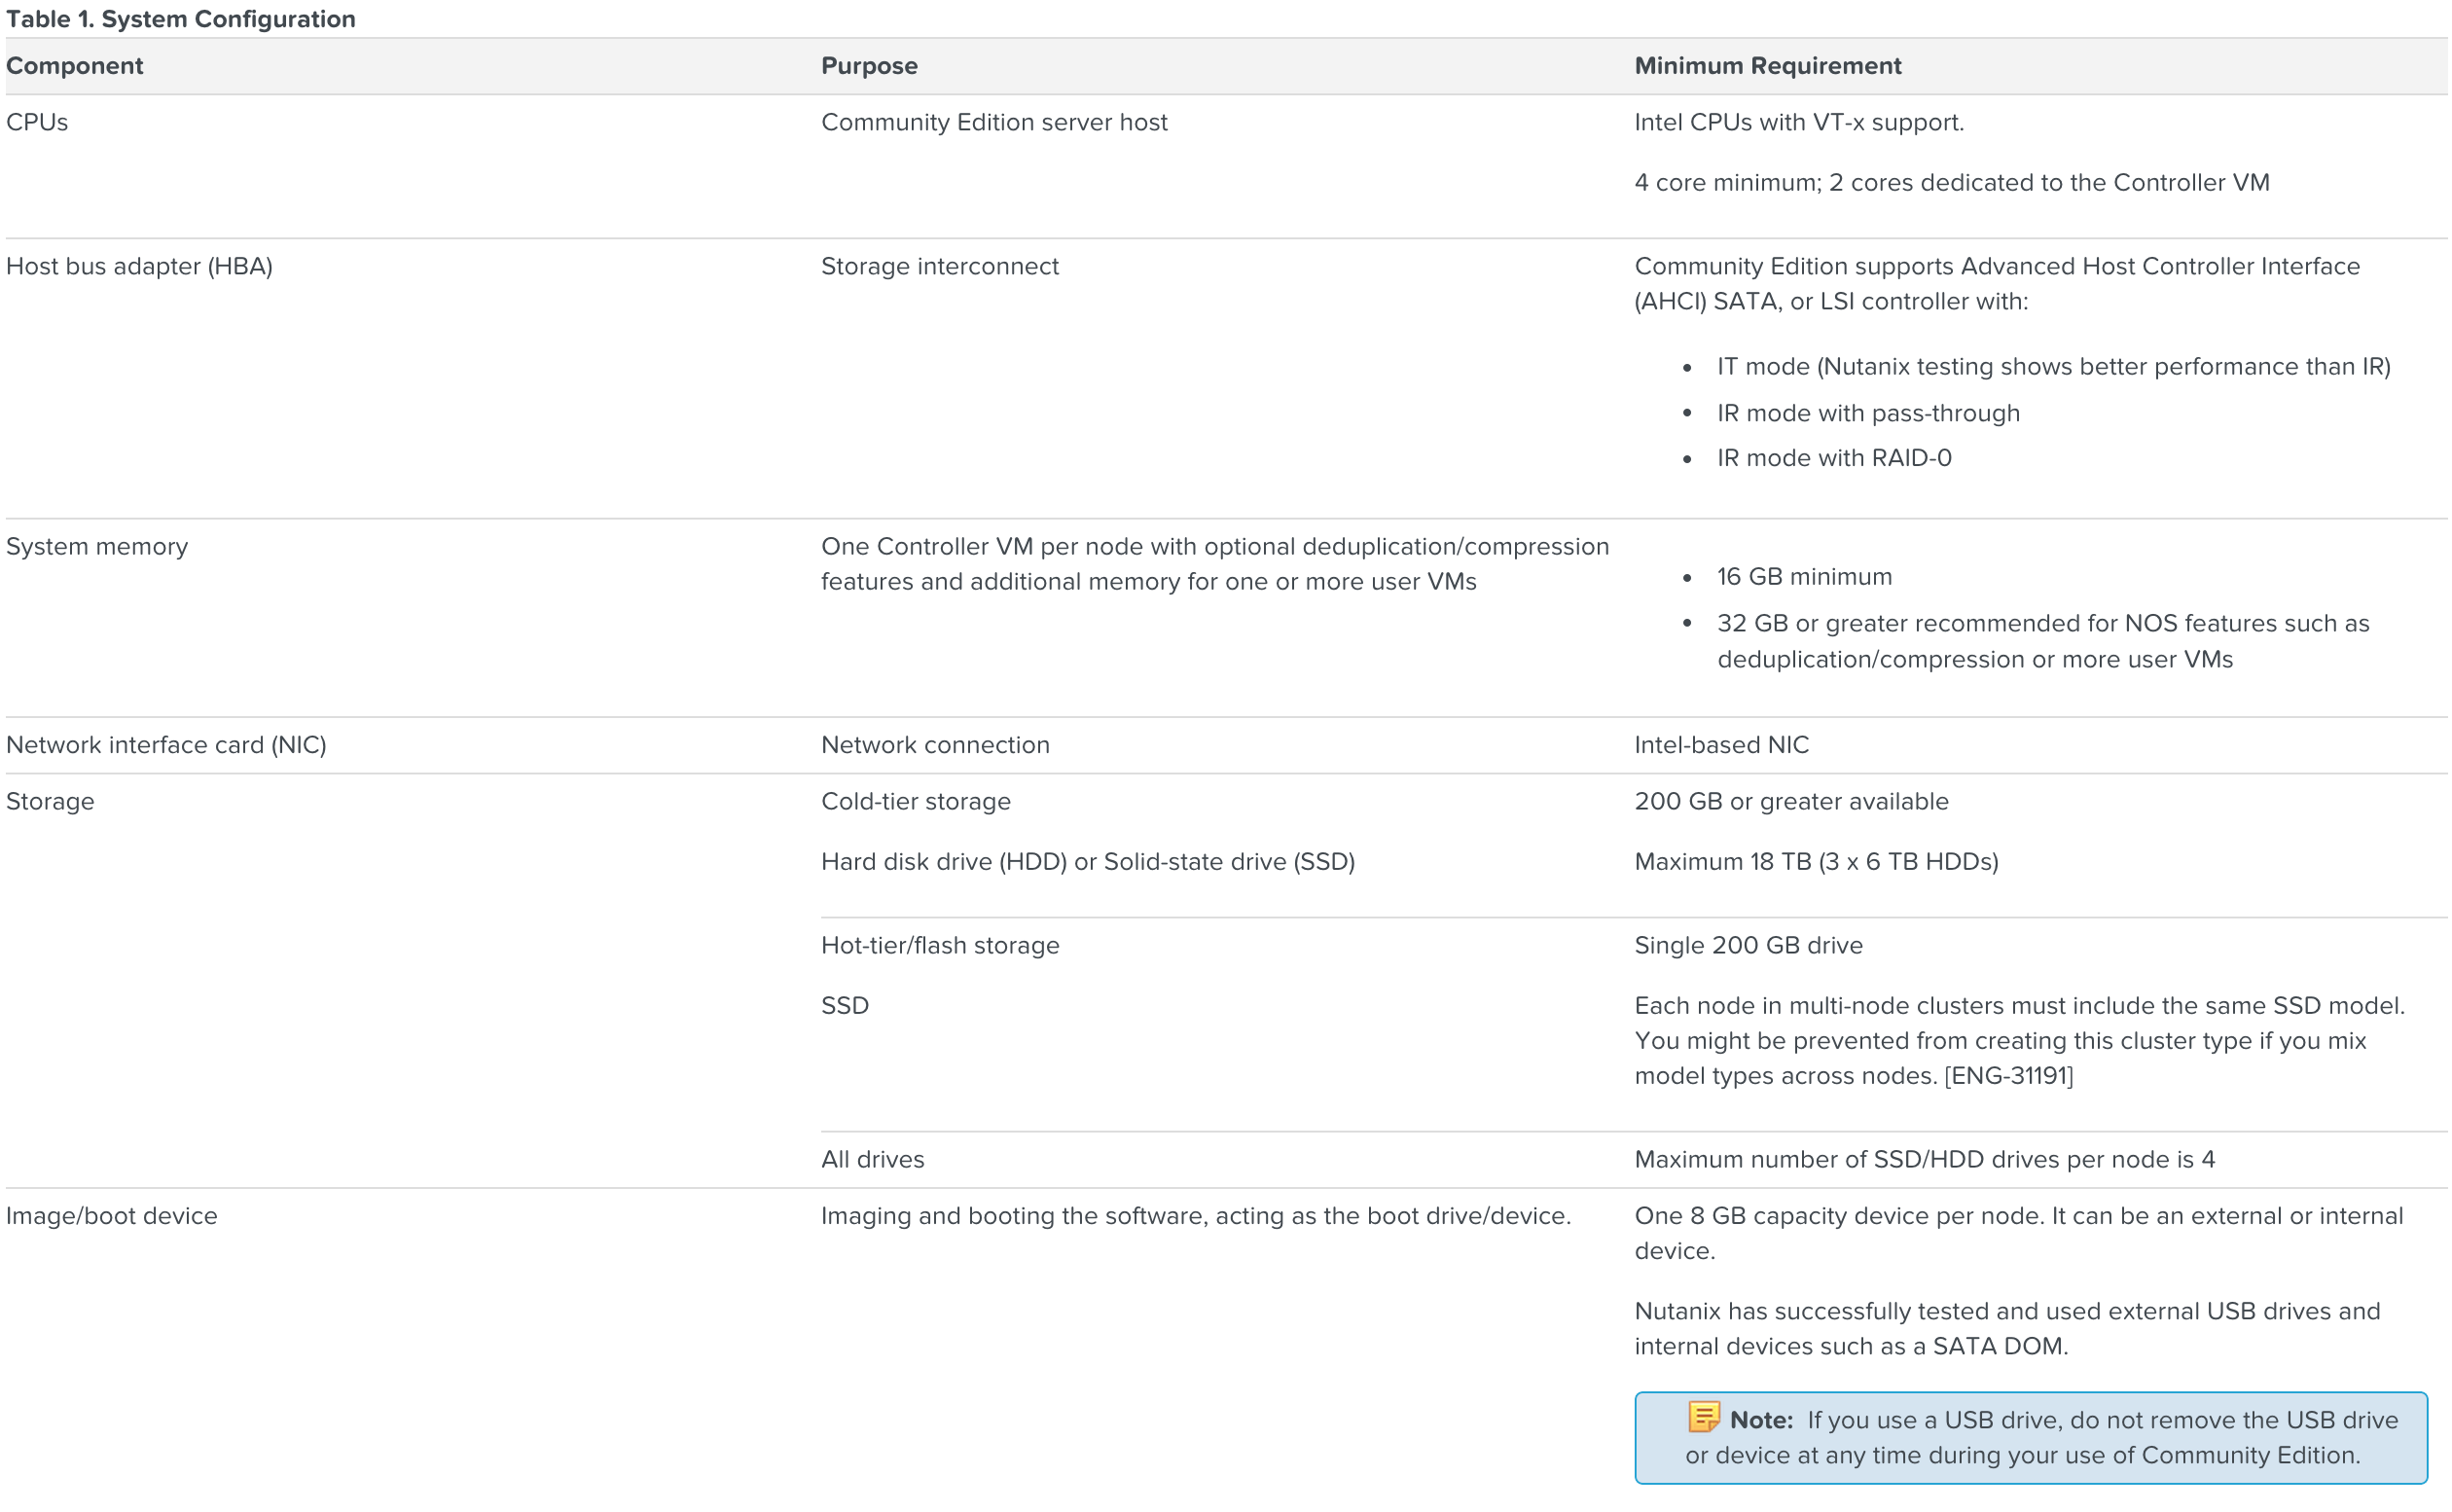
As it stands right now CE requires the following hardware;

CE Requirements

I am on my third hardware revision since I started testing CE and have settled on a node configuration that won’t lead to divorce due to the cost while allowing me to expand from a single node to three in a multi node environment.

I have also had good success with older Dell workstations, which were fine for single node testing but for my purposes I wanted something with better density and noise properties.

Happy to confirm this budget cluster is fully supported by CE without any issues and even has full VT-d support even though that has now been dropped as a requirement for CE;

Antec NSK 1480 Mini Desktop Case w/ 350w PSU

Intel i5-4590 Haswell Processor

ASRock B85M PRO4 Motherboard (vt-d supported)

Intel 730 Series 240Gb SSD

2x Hitachi 4TB 7200RPM NAS AP

 2x Corsair 16GB (2x8GB) for 32Gb DDR3 Memory

I have been blown away by the performance of my budget CE cluster, it’s certainly punching above it’s weight delivering IOPS comparable to many commercial SAN products costing a magnitude of order more.

This node configuration worked out to be just shy of $1,500 AUD a node thanks to our tanking Aussie dollar at the moment. However a lot of that cost is in the cold storage tier and you could easily get it under the $1k mark using single 1TB HDD’s per node instead.

For my testing purposes however I wanted to be able to throw around a bit of data and still have enough capacity available to cover for node failures.

Looking at Prism you will first notice we are using KVM as the hypervisor, at this time KVM is the only hypervisor supported by CE, also note the “CommunityEdition” model designation. Other then that Prism is unchanged. All the functionality currently available in production is available in CE as far as I am aware. This is not a feature stripped release, so you get things like dedupe and compression on both storage tiers if you so wish.

CE Prism

I should however point out KVM both in production and CE do not yet support A-Sync DR so the Data Protection menu is missing from CE, however I am told this is tentatively targeted for NOS 4.2 so we should see Data Protection come alive in CE sometime after that.

The onboard Asrock Intel NICs worked flawlessly and served me well for many weeks of testing but I have recently added 10Gbe Intel X540-T2 adaptors paired to a Netgear XS708 10Gbe switch to boost performance between the nodes.

So the final destination for my CE hardware journey ended up looking a bit like this;

CE Home

There were a great deal of iterations to get to this point and all of them worked, in fact very little of what I tested didn’t work. This is purely the hardware platform I felt best suited my needs and desire to serve as a reference architecture for future CE testing.

Personally Community Edition has well and truly delivered the training framework and user experience I was expecting and hoping for since early 2014.

Individuals wanting to expand their knowledge in a practical manner can now utilise CE as a training tool. Recently I sat in on a NPP training day and couldn’t help but feel how much easier life would be for the participants if they could go away and rerun the majority of lab exercises in their own training environment.

Even simple things like developing scripts or interacting with the REST API’s can now be done without fear of hosing a production environment.

With the release of CE I fully expect to see the number of NPP’s getting around increase, I know it would have helped my own NPP training when I did it. Nothing beats practical experience.

Training aside, CE will allow people not previously exposed to Nutanix to test drive the environment and get a feel for how NOS operates in a not to dissimilar fashion. It’s one thing to be told and it’s entirely another to experience it for yourself.

You can preregister for the CE Beta Program by clicking here

It is still early days and there is much more to come I assure you. If you haven’t already registered for the Next Conference I highly recommend you try and get along. This isn’t going to be your standard industry event powered by vendors or partners; this is about us, the users, powered by users and real world experiences.

As an NTC, an NPP and as an End User I would love to see you there and talk to you about your Nutanix experiences and your environment.

Delete on Reboot

Just a quick one today,  have you ever had a directory they just wouldn’t delete and you didn’t want to have to try downloading some crappy tool to do it for you on reboot?

Well I have and here is my solution… We are going to add an option to the right click contextual menu on Windows XP Pro, though this should work with any version of XP, and if it doesn’t oh well…

Fire up your favorite text editor, vi is highly recommend or ultraedit if stuck on Windows.  Create a file called something like Sendto.reg with the contents of;

Windows Registry Editor Version 5.00

[HKEY_CLASSES_ROOT\*\shell\Delete on Reboot\command]
@=”CMD /E:OFF /C REG ADD HKEY_LOCAL_MACHINE\\SOFTWARE\\Microsoft\\Windows\\Currentversion\\RunOnce /v \”Del %1 OnNextReboot\” /d ^\”cmd.exe /c DEL /F /Q \\\”%1\\\”\” /f\””

[HKEY_CLASSES_ROOT\*\shell\Open]

[HKEY_CLASSES_ROOT\Folder\shell\Delete on Reboot\command]
@=”CMD /E:OFF /C REG ADD HKEY_LOCAL_MACHINE\\SOFTWARE\\Microsoft\\Windows\\Currentversion\\RunOnce /v \”Del %1 OnNextReboot\” /d ^\”cmd.exe /c RD /S /Q \\\”%1\\\”\” /f\””

Now save the file, and merge it into your registry.  Now you should have the option “Delete on Reboot” in your right click contextual menu.  Now this is not all encompassing but works for most things.  The gotcha’s you need to know about are it will only work if you log in again as the same user as it processes as a run once command for that user just after login but before the shell is loaded.

If the directory is being locked at the system level it won’t remove it as well the system will already have locked it by the time the users is enacted.  However this works for 90% of the instances where this issue seems to crop up.

Enjoy, and as always if you aren’t comfortable playing in the registry, simple don’t and get an adult to supervise you 🙂

Stream NAS content with Windows Media Player

Recently I off loaded my media content to a Thecus NAS which I just put 4 new 2TB drives in.  A side effect of this the Windows Media Player that I use to serve DNLA content to my Playstation 3’s and Xbox can’t stream NAS connected mapped drives from it’s library.

This seems to be a standard with windows streaming server products and I have a feeling it’s because they want these mapped drives indexed.  Not to be deterred it was time to find a work around.

Enter stage right MKLINK, in the world of Unix we’d call this a symlink (Symbolic Link) and it’s a concept older then I am practically but very new to the world of Microsoft.  A symbolic link is simply a filesystem object such as a directory that points to another filesystem object as the target.  Prior versions of Windows could have junction points but these differed in that they could only deal with absolute paths on local drives.  What we can now do is create links to relative paths over networks.

But this in itself isn’t enough to fool Windows Media Player, as it still wants to see the path indexed so we’ll have to cheat a little to make it think it’s all cool.

  1. Firstly we need to create directory to house our target, ie.  g:\content.
  2. Then go into Windows Media Player and add this folder to your Library.  Once added it will be indexed.
  3. Now we need to close down Windows Media Player, you can also stop the service if you like to be sure.
  4. Go back and delete the directory you created in step 1, as we no longer need it.
  5. Open the command prompt with elevated rights.
  6. Using MLINK create our new symlink to replace the directory we deleted in step 4;
    mklink /d g:\content \\server\content

So now we have a non-indexed UNC path in our Windows Media Player Library.  Open up WMP and you will see your NAS content start to appear as if by magic as not WMP believes it to be a local drive and not on the network at all.

Happy streaming.


iPad apps for getting it done.

As we progress into an ever portable world I find myself spending less and less time at my desk in front of my workstation.  This new found devotion to being out and about has required a bit of a rethink in how I do things and get things done in time without merely just not doing them.

Enter my iPad, it’s nothing new really I’ve had it since they were first released a couple of years ago and I’m still using the original, maybe in March I’ll update though truth be known I’d rather keep it and just get a new MacBook Air.

Anyway lets progress, what has changed is how I employ my iPad to greater benefit my time management.  (I highly recommend you delete angry birds and bubble blast as well).

I have decided I would list here my concoction of apps for getting it done now I’ve lived with them for some time and have found the sweet spot and deleted all that other junk I didn’t need and was just serving as a distraction.  I’ve also included some that really aren’t work related but I love and use all the same.

Keep in mind I work in IT Management… individual mileage may vary…

1.  Dropbox

This is absolutely a must have, Dropbox ensures all my on the fly data is perfectly in sync between my iPad, iPhone, Workstation at home and in the office.  It’s what binds it all together and makes it work.  Dropbox is used by sooo many apps for cloud based data storage and you’d have to be a leper not to use it.

2.  Notebooks for iPad

This right here is the bread and butter folks, every meeting I go to this app is the star.  Create rich format notes, sketches or books quickly as the meeting happens.  Lets you add photo’s, links, rich text formatting to your minutes or note taking.  One of my favorite features it’s ability to tag all notes with the location and time stamps.  When you are done it can be set to automatically push your notes to your dropbox account so when you get back to your desk they are already there for final editing or action.

3.  iWork

Okay so it’s not really called iWork, really I’m taking about the three apps from Apple for productivity being Pages, Numbers and Keynote.  These are pretty stock standard for creating and reviewing documents, spreadsheets and presentations.  Generally I do very little in the way of creation on the iPad however I love these tools for reviewing material sent to me and makes quick adjustments on the fly then sending them back.

4.  Mail + Messages

I figured I should mention these two,  even though they are standard app’s that comes with the iPad.  They both rock my world, being able to send free txt messages to other iOS devices with Messages is simply awesome.  It’s helpful that 98% of those I want to communicate with in this manner use iPhones but still it’s awesome.  I don’t think there is any doubt how extremely important email is these days in the business world, it’s more important then the phone seriously.  Mail allows me to be in constant contact with the business, weather it be staff, customers or suppliers.  Communication is king in my world and with Mail no matter where I am or when I am doing it I can communicate effectively.

5.  Desktop Connect

This is a wonderful tool for remote administration of your Microsoft Servers and Desktops.  Supporting both RDP and VNC it allows me to connect to any workstation on our network and carry out support or administration tasks.  Great over VPN next to the pool.

6.  Filebrowser

One of the iPads default failings by design is it’s lack of interoperability with other networks and file systems.  It’s like having a Ferrari with a flat battery.  Filebrowser breaks you free of those shackles and seamlessly gives you access to your data over the network with inbuilt viewers for various file types and the ability to then send those files to other apps like Pages or Numbers for easy editing or to email and print.  This gives you the diversity that’s needed to preform a large number of productivity tasks out side the office.

7.  Teamviewer

Another remote support app, but a little different in that I use it to maintain systems outside my normal network boundaries.  Could be staff at home, or just a machine in a unsecured location.  The other feature I use a lot is the meeting function to hold conference calls with parties external to my business.

8.  Skype

I think by now we all know what skype is and does, but for those that don’t it lets me turn my iPad it’s a giant phone by allowing me to make voice calls over any available data network.  I generally don’t use it that often but some times you need people to hear the anger in your voice to get things done.

9.  CardMunch

This app is a great time saver, and quite possibly the only redeeming feature of LinkedIn.  I don’t know about you but when I go to meetings or conferences I always end up with a bazillion business cards that need to then be transcribed.  This takes all the pain of that away.  Simply take a photo of the business card with CardMunch  and then wait for it to automatically transcribe the cards details and create an address book entry.  It’s that simple.  Works faithfully every time with very little error, think in 100 cards there might be 1 that needs an edit.

10.  Kayak Mobile

Kayak is used to search for flights, accommodation,  and hire cars as well as having the function to track your trips if you provide it your itinerary.  This quickly speeds up how long to takes me to book my flight where I am going to stay and what hire car I am going to use for my trip.  On the other side of the coin if I have to pick up someone from the airport and know their flight number it can track that too and tell me if it’s on schedule or if it’s been delayed.

So that’s my top 10 for getting it done, but there are some others that I think deserve mention just cause I like em and they have done enough to earn salvation and haven’t been relegated to deletion.

11.  Google Search

Sure you can search in Safari or what ever browser takes your fancy, but I find doing it via the app far more effective and convenient, and it allows for voice searching whilst is kinda creepy is also mildly amusing.  Really though the searching is just the surface, because this app directly connects you to all of your other Google services such as Docs, Google+, Earth, Translate, Maps, and Photo’s.

12.  Twitter

I’m almost embarrassed to add this to the list but I admit it I like twitter, it reminds me an ongoing series of Haiku.  Besides Charlie Sheen has twitter and it’s all about the Winning! right?  The reason I really like twitter is it lets me to connect to those people I find interesting but don’t really know, or really don’t want to know.  It also lets me take a pot shot at those pollies every now and then whilst being kept informed about upcoming gigs by artists I like directly by that artist.

13.  OPlayer HD

This is my VLC equivalent for the iPad and a great way to play movies and other video media on flights, in taxi’s or even in the bath just don’t drop it.  Supports all major formats, divx, flv, mkv etc etc.  Great for playing content from Urls, embedded on websites, SMB/CIF shares and FTP.

14.  Garage Sale

This is a cut down version of the app on my Mac, but it’s still 100% functional.  This is the tool I use to sell all my crap on ebay, comes with a stack of good looking templates and really takes the effort out of creating good effective ebay auctions.  Highly recommend it if you are doing more then 2 sales a year on ebay.

15.  Photo-Sort

Photo’s for me is the iPads biggest weakness, lets face it the stock functionality is shit and beyond useless.   Photo-Sort goes along way to correct this weakness.  I really don’t know what was going through Apples mind when they come up it but they were obviously lacking sleep.  Using this app you can sanely get photo’s in and out of your photo library.  Still not the best though in terms of functionality, in fact I’d still like it better, so while it’s lacking it’s better then it was… might look for others.

16.  Word Press

I admit it I don’t update this blog as much as I should, but at least I can do it on the fly using the word press app on my iPad.

17.  Wikipanion

Best way to cheat at a trivia night 🙂 or just to look something up when your out an about.  I actually like it as a history buff, I can see something when I am away and get a bit of info on what I am looking at.  Also good for making you look smarter then you are at events.

18.  Pocket Weather AU

As someone that likes to ride motorcycles a lot and does the odd bit of travel this is a must have.  Not only will it give you the standard crap like the temperature and this weeks out look but my very favorite feature is that is gives me the radar.  I can see exactly where that rain is coming from and where it’s going.  There is a Global version of this software that is very handy as well if you happen to travel internationally.

Well that’s it folks, that about wraps up whats on my iPad and what I find useful to have at my finger tips when I am away from my desk.  In terms of last mile connectivity the iPad really has no match in the market place despite what Google and Samsung would have you believe.   Do yourself a favor avoid the knock offs and just get the iPad.


Oracle Solaris Studio 12.2 on Solaris 11 Express

It’s that time again where I like to get my hands dirty with a new project, so I am going to try and move our Fabrication CAD/CAM users off their PC’s and onto my favorite Sun Ray thin clients by using the Sun Ray 5.2 framework with Vmware View.

As part of this I wanted to install the Sun Studio for development, now called Oracle Solaris Studio.

It seems there is a bit of an issue at present with this on Solaris 11 express, if you try and install by the package installer it gives you and error telling you to install Studio via the IPS system from package manager.  Only problem is Studio doesn’t actually exist in the Oracle pkg repository.

To get around this we are going to extract the packages from the installer and install them ourselves.  I don’t want to use the tarball Oracle provide as I want the packages registered in the management system and besides this way we get the lovely menu icons in Gnome.

Unto the step required;

  1. Download the Solaris Studio 2.2 package from here.
  2. Extact the package with bzcat SolarisStudio12.2-[OS]-[PLATFORM]-ML.tar.bz2 | tar -xf –
  3. Create a temporary folder to extract the set of SVr4 packages to with mkdir tmp
  4. Now time to extract with
    • ./SolarisStudio12.2-solaris-x86-pkg-ML.sh –non-interactive –extract-installation-data  tmp/
  5. If like me and your /tmp is less then 1Gb you will get an error, so append –tempdir to the above command
  6. Next is a simple cd tmp
  7. Lastly is the magic bit for i in SPRO*; do pfexec pkgadd -d $i; done

Now I should probably have mentioned before that lot that in order to use Solaris Studio you will require some additional packages as prerequisites.  Firstly I will provide the list I had to obtain, and then the list of others you might need to check to make sure they are also installed.

  • system/header
  • developer/java/jdk
  • developer/library/lint
  • system/library/math/header-math

This will not be present if you installed Solaris 11 via the LiveCD or VirtualBox image, in fact I doubt they are there even if you used the text installer or other methods, I just can’t say for sure with the others.

To install these you need to pkg install system/header etc for each of packages you are missing, you can check to see if they are installed or not with pkg info -r system/header etc…

The other dependencies you may need to check are as follows;

  • system/library/math
  • developer/macro/cpp
  • system/library/c++/sunpro
  • developer/linker
  • developer/build/make

However I suspect they should already be present.  After all that you should be good to go, log out and back into your desktop environment and you should even have some new lovely development icons.

Ripping Tv Shows into iTunes

Friend recently purchased and Apple Tv, wish he hadn’t… I know they are cheap, small and cute but really they are too locked to be of convenient usage to me I am much more a fan of the ps3 as a media extender.

Anyway so the question cameto be “What is is the best way to rip purchased DVDs into iTunes so that I can play them on my iPhone and Apple TV?”

Why anyone would want to play a movie or tv show on an iPhone is beyond me, I’ll just pretend he said iPad because that’s groovy to watch stuff on in bed or in the car while the missus does the driving.

The first thing you need to do is grab a few tools for the process.  The worlds best media player VLC, my favorite iTunes ripping and converting tool Handbrake and lastly iDentify for tagging the files we create to make them sweet in iTunes.  Please note if you decide to get the 32 bit version of either Handbrake or VLC  you must also get the 32 bit version of the other and vice versa for 64 bit versions.

Handbrake will use VLC to read the commercial DVD, VLC is providing the smarts to decrypt and play the disc media and Handbrake will do the heavy lifting of ripping and converting the media so it can be added to iTunes for use on your Apple devices.  Then iDentify will add the required Metadata to the resulting files so they don’t look shit in your iTunes library.

Once you have the tools it’s time to get on with the Job;

  1. Open Handbrake.
  2. Insert DVD and choose the first title then click toggle presets and choose appletv2.
  3. Click start.
  4. Choose the second title and click add to queue.
  5. Continue as (4) for all titles you wish to add to your library on the DVD.
  6. Once completed start iDentify and tag your files, they should be renamed Show S01E01
  7. Add the updated files to your iTunes Library.
  8. Make popcorn and profit.

As you can see the process is pretty straight forward without much fuss, but if you are planning on doing this a lot I highly recommend you automate the process and let it run over night using Batch Rip Actions for Automator.

RDP Printer Mapping

Every now and then there is the need to install client side printers on 2003 Terminal services.  For this to work the driver name on the client side has to be an identical match for the server side.

When the client and server side operating environments differ this is not always possible as Windows 7 drivers names invariably differ to that of XP and 2003 server driver names.

To get around this we use driver name mapping to correlate the names.

To create a mapping file in Windows 2003 Server , you must add two registry keys:

Key: HKLM\SYSTEM\CurrentControlSet\Control\Terminal Server\Wds\rdpwd
Type: REG_SZ (string)
Value: PrinterMappingINFName
Data: Path to our new INF file eg c:\windows\inf\printmap.inf

Key: HKLM\SYSTEM\CurrentControlSet\Control\Terminal Server\Wds\rdpwd
Type: REG_SZ (string)
Value: PrinterMappingINFSection
Data:  The name of the section we assign to printers in our INF above eg Printers

Note the Value is very important, if named anything else this will not work.

We now have to create our INF and create the section Printers with the driver names we want to map;

;PRINTMAPPINGS.INF
;This file is used to Map Client side print drivers to Server side print drivers

[Printers]
;Syntax is “Client Printer Driver name” = “Server Printer Driver name”
;To locate the client side name look in the advanced tab of printer preferences
;Or see the error log in event viewer on the Server side.

“Canon Inkjet iP4600 series” = “Canon iP4600 series”

You can have multiple mappings to the same server side driver as well.  Once you have completed the above three tasks you need to restart the Print Spooler service on the terminal server.

If  when restarting the print spooler service you receive the error;

Event 1110: “Error processing ntprint.inf. If the file on the system is corrupt, you can restore it from the installation media.”

It is a red herring and means you got the syntax wrong along the way some where so go back and recheck your mapping file.

Zimbra override RBL

Okay Bigpond is giving me the shits today, I have a few customers that insist on using Bigpond for their mail and as such I need to ensure I can get mail from bigpond even when they are on the RBL shit lists which is a daily occurrence.

A normal white list in salocal.cf.in won’t cut it as those white lists are for spam assassin and we are dealing with postfix here.  So I can either drop the RBL that is blocking Bigpond or I can create a framework for dealing with whitelists and RBLS for postfix.  Dropping the RBL is not the solution I am looking for.

Ok lets get this show on the road…

su zimbra
cd /opt/zimbra/conf
vi postfix_rbl_override

This file is going to contain our “white list” either as a domain or IP address, for bigpond mine looks like;

61.9.168.140 OK
61.9.168.143 OK
61.9.168.149 OK
bigpond.com OK
bigpond.net.au OK

So what I have here are the known black listed IP’s of mail servers I want to get through and the domains of the provider.  Now we want to run the command postmap /opt/zimbra/conf/postfix_rbl_override This will alert postfix changes have been made to the database and to reload it.

Next step is to tell postfix to check our override file when rejecting recipient mail vi postfix_recipient_restrictions.cf

Under “reject_unauth_destination” we want to add the line “check_client_access hash:/opt/zimbra/conf/postfix_rbl_override” So what you should end up with is the file that looks like;

reject_unauth_destination
check_client_access hash:/opt/zimbra/conf/postfix_rbl_override
reject_unlisted_recipient

Once this has been done you are in business however you should probable run zmmtactl restart to be safe.

Task Manager Disabled?

A laptop was brought into me this morning and it was declared it had aids (damn russian porn sites).  After removing said infection it was found that certain registry keys had been tampered with among which was preventing the task manager from being run with the message;

the task manager has been disabled but the administrator

obviously thats a load of rott as I have better things to do with my time.

I offer the following three methods of dealing with this, the 3rd is the direct route but the others are a good idea to reset permissions in general to a out of the box state.

1.  Run the following command from a command prompt to check and reset the registry values and file permissions;

secedit /configure /cfg %windir%\repair\secsetup.inf /db secsetup.sdb /verbose

2. Run the following to rebuild the security database from the initial template;

secedit /configure /db junk /cfg “c:\windows\security\templates\setup security.inf” /overwrite /quiet

3.  The direct path to fix the actual Task Manager Key, just paste this into the run box.

REG add HKCU\Software\Microsoft\Windows\CurrentVersion\Policies\System /v DisableTaskMgr /t REG_DWORD /d 0 /f

I also had to set all the zones in IE back to defaults to allow the user to be able to download etc…

Death as a possible side effect…

I have never been much of a green thumb, in fact I can’t think of anything worse then spending time in a garden actually gardening.  However these seemingly innocuous plants which are commonly available all over Australia have peaked my interest, even morbidly so… no cause for alarm people just passing curiosity, after all what are we without knowledge?

1. Foxglove (Digitalis purpurea):

  • Works by using Digitoxin and Digoxin.
  • LD50 is 0.3mg/kg (0.3ppm) .With a 3x’s the LD50 for a quick and clean one, it requires 10mg of digitoxin for every 45kg you weigh. Be sure to add a little more to be on the safe side. Foxglove upper leaves contain 0.3-0.62% digitoxin, so if you weigh 45kg’s, going on the safe side of 30mg, that would be 11.53g of low-concentration leaves. with high concentration leaves, that would be only ~5g to kill you.
  • Foxglove is easy to recognise, the flowers look like a lot of bells hanging down from a central stem/trunk.
  • Foxglove retains its poisoning potential after drying, great for drying, storing, then making nice, fresh, all natural herbal tea on a cold afternoon. Since it retains poisoning potential after drying, you can mill it into powder, fill up empty pills for  ‘quick check-out pills’.
  • Possible side effects may include nausea, vomiting, burning in the mouth or adominal area, death, coma, diarrhea, abdominal pain.

2. Oleander (Nerium oleander):

  • Very Pretty flowers. The flowers spiral around. Very Pretty. You should get some just to look at, even if you are not going to kill yourself.
  • Works with Oleandrin and Neriine [sic?] as toxins.
  • A single ounce of leaves kills a 450kg horse. 20 leaves is fatal to an adult, make sure you take at least 40 to be on the safe side. Brewing them as tea may work. Mashed fresh oleander seeds has an LD50 of 0.5mg/kg (0.5 ppm). If my sources are correct, then that should be ~70mg for every 45kg you weigh. Other sources say 110mg/kg (110ppm), which equates to 5 grams for every 45kg you weigh.
  • It has very pretty flowers that spiral around.
  • Possible side effects may include nausea, vomiting, coma, excess salivation, tremors, death, increased blood pressure, abdominal pain.

3. Yew:

  • Works with alkaloid toxin Taxine.
  • The seeds inside the berries are the most poisonous, with only less than a handful killing a grown man. The rest of the plant is poisonous, except for the berries. The LD50 is 200-400mg/kg. The seeds have more of the Taxine. The toxin is very fast reacting, that some symptoms will not appear before death. Make sure you take lots to be on the safe side, if you live where yew is natice, then it won’t be difficult to gather enough seeds.
  • The berries are red, and it is an evergreen.
  • The berries are not poisonous, and are sweet and nice tasting.  The seeds are the most toxic.
  • Possible side effects may include: loss in perception, muscle tremors, death, collapse followed by convulsions, asphyxiation. Some side effects may not occur because the possible side effect of death comes to quickly to allow the other side effects to appear.